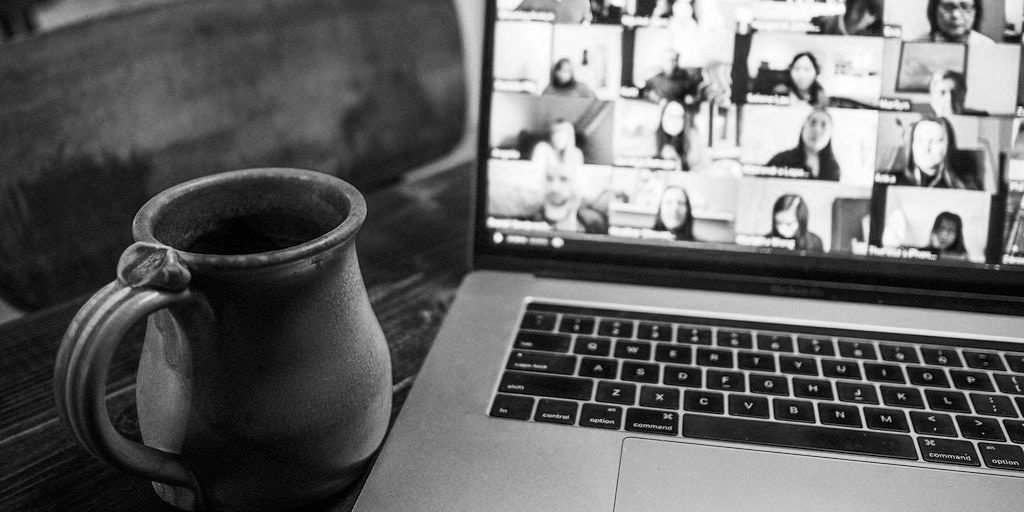
By: James Hurley
Good lighting is the foundation of good video. The correct lighting can make you appear confident and competent while poor lighting can cause you to appear unprepared or unprofessional. Lighting for a virtual meeting or presentation becomes even more important because the human eye and a digital camera do not see light in the same way. In the next few minutes, we will look at a few important lighting factors and how they apply to your virtual meeting or Zoom call.
4 Ways to Improve Lighting on Video Calls
- Change your light bulbs.
- Turn off lights that do not match.
- If you have a camera that allows you to adjust the color
temperature, but sure to set it to match the lighting. - Purchase studio lighting if your budget allows
The Best Light
I am often asked, “What is the best light for my Zoom room?” The answer to that question is, “It depends.” It depends on many factors. Because light is not just light. In this case, we are lighting for video. We won’t discuss lighting “hacks”. We are going to talk about lighting principles that apply in the typical virtual meeting. These principles will work the same way every time and give you pro results. The main factors that we will look at include the environment, the light source, light placement, and the color temperature.
What is Good Light?
Let’s start our conversation by discussing what is considered good light for a video call. For most of us, a large soft light will be best. The hardness or softness of a light is based on the shadow that is cast by the light source. If a shadow has a hard crisp line, it is considered hard. If the shadow line is undefined then it is considered to be soft.
Take a look out your window. Is it cloudy or do you have clear skies? If the sky is clear and the sun is overhead you will see very distinct shadows with well-defined edges. The shadows may be hard to see if the sky is completely overcast. This is because the sunlight is being diffused by the clouds and causes the light to hit a subject from many points. When there are no clouds in
the sky, the sunlight is direct and strikes a subject from one direction, creating a very distinct shadow.
The larger the light source the softer the light.
Why is this important? The answer is quite simple. Hard light will magnify every blemish on your skin. A soft light will make your skin look smoother and more pleasing. In short, the larger the light source the softer the shadows will be. That is our first principle of light. The larger the light source the softer the light. This principle of light will come into play when we choose the light source we will use for our meeting.
Use Natural Light
Let’s first look at natural light and see how we can use it to our advantage.
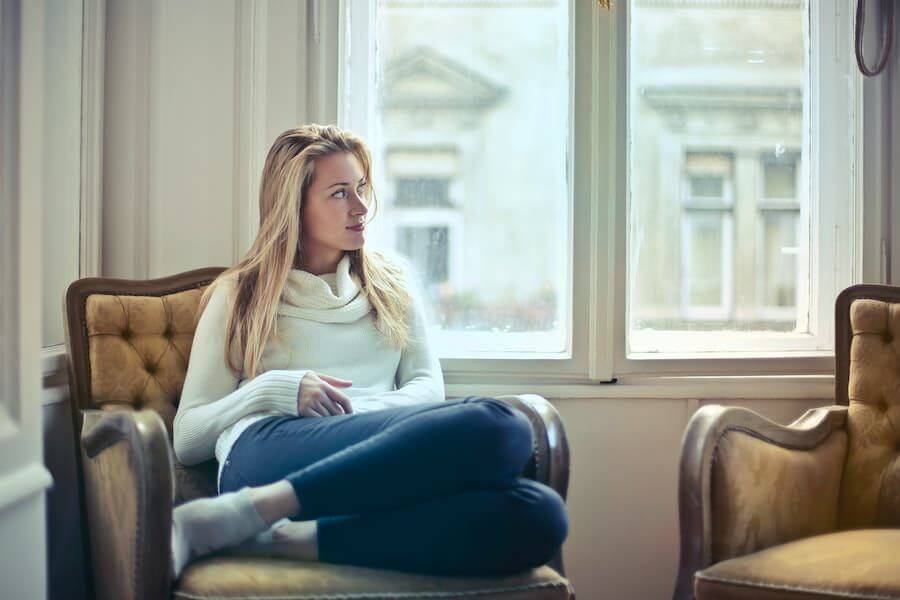
The sun is the one light source that everyone has access to. Natural light can be beautiful and is often used by portrait photographers. A large window with indirect sunlight is best. This means the sun is not shining directly through the window. In short, if you can see the sun, the light will not be flattering. It will be harsh. The result is every blemish on a person’s face will be magnified. This is typically not what we want. If you are in the northern hemisphere, a North facing window will always have indirect light.
But, even if your window faces the Southern sky, and the sun shines directly through, you are not out of luck. You could consider the time of day, and schedule your meeting when the sun is not shining directly through the window. But, most cannot schedule a virtual meeting based on the position of the sun. In this case, you could add some diffusion to cut and diffuse the light, just like the clouds on an overcast day. Every pro photographer or cinematographer uses diffusion. Diffusion allows us to control the light and shape it to meet our needs. Simple sheer curtains can take direct, bright sunlight and turn it into a large, soft, and flattering light source. It is that simple. If the light is still too bright, add another layer of sheer curtains.
Shape the Light

When using natural light through a window you will want to make sure that you set up your desk area so that you are facing the windows, or even better positioned at an angle up to 45º to the window. With your desk set up directly facing the window, the light will be very even across your face. You will look very professional and great on your call.
If you want to step it up a bit and look a little more cinematic try rotating your desk up to a 45º angle. Doing this will allow the light to drape across your face. One side will be brighter while the other side will be shadowed a bit more. This will add depth and dimension to your features. Play with this and find the angle that works for you.
Make sure the brightest light is used to light your face.
One mistake I’m sure you have seen is setting up a call with windows in the background. Remember the camera sees light differently than the human eye. It may look beautiful in real life, but the camera will struggle to create a usable image in this case.
Most webcams are not able to expose properly with large differences between bright and dark. During the day the light is much more powerful outdoors than it is indoors. The net result is this. The main light is now behind you. The camera must expose to the bright window light. This throws you, the subject into darkness. This is particularly hard for others on the call to watch and makes you look like an amateur.
Add a Bounce
If you are having fun and want to take this a step further, you can add some bounce. That is, we are going to bounce some of the light that is shining across your face back into the shadow side.
This is easy to do with a piece of foam core. You can pick this up in the art supply section of Walmart or your favorite art supply store. Prop up the card so that it can bounce the light from the window back into your face. This will gently soften the shadows and fill in your face a bit more.
Artificial Light
To this point, we have been talking about using the sun as our light source, but that beautiful, natural light is not always available. Enter artificial light. This could be overhead lights in the ceiling, a lamp, or a more professional studio light. First, I will touch on common lighting that is likely already available to you – your house lights.
Common Lights
Before we begin we need to consider another principle when trying to create good light. The second principle of light we should consider is the angle or direction of the light. For many, the main light in the room is an overhead light that is hung in the center of the room. This provides very even light throughout the area. But, unless you place your desk so you are facing the light your face will fall into darkness.
We want your main light to come from in front of you and illuminate your face. To help balance the light and bring focus to you use a desk lamp as the main light source. The overhead light can be used as a secondary light illuminating your space.
Consider the direction and angle of the main light.
A lamp with a nice shade can produce beautiful light. But, remember our first principle of lighting: the larger the lampshade the better the light. Second, use a white lampshade. Using a colored lampshade or one that is off-white or yellow will produce a color cast that will not be flattering. Keep it simple and keep it as large as you can. You can control the brightness by choosing a brighter or dimmer bulb or by moving the lamp closer or farther away from you.
Mixed Lighting
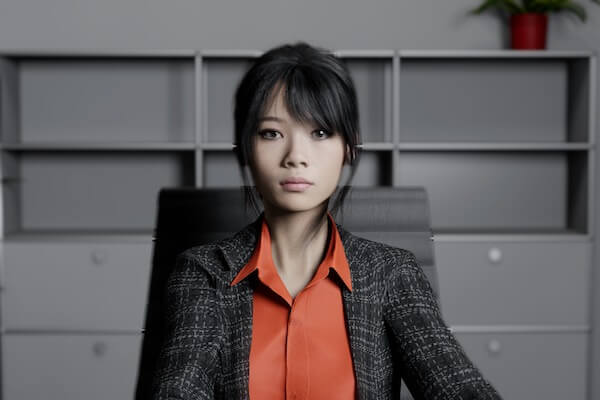
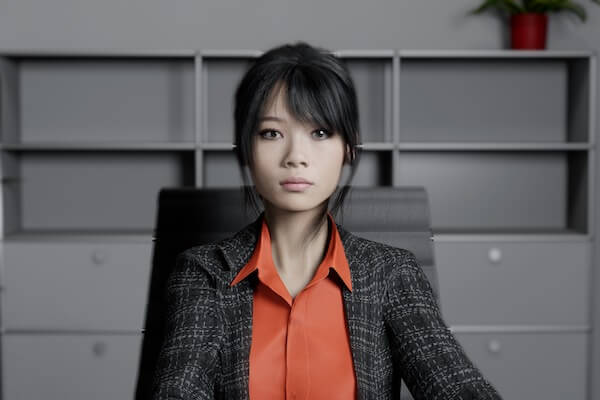
Now, let’s consider a common problem that comes from using household lights-mixed lighting. This is the principle of the color of light. Mixed lighting is the result of using different kinds of lights. Incandescent lights look different from CFL or LED. Fluorescent lights can look different as well. We are specifically talking about the color temperature of a light source. Color temperature is measured in Kelvin and can tell us what the look and feel of the light will create.
- Incandescent lights – 3200º kelvin. Incandescent lights have a yellow hue.
- LED – LED lights are blueish but can vary in color temperature. 5500º Kelvin.
- Fluorescent – Fluorescent lights have long been the bane of photographers. They often cast a green tint. 4000º Kelvin.
- Daylight – Color temperature varies throughout the day, Sunrise/Sunset 3600ºK, Midday 5500ºK, Cloudy 6500ºK.
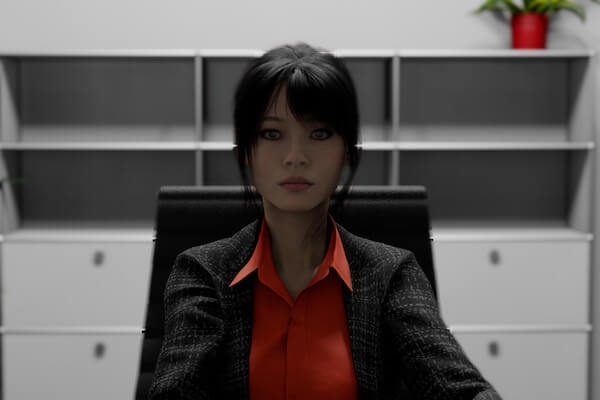
The camera is unforgiving when it comes to color temperature. Using lights in your environment with different color temperatures will cause your video to look odd or downright bad. Take a look at some of the examples below.
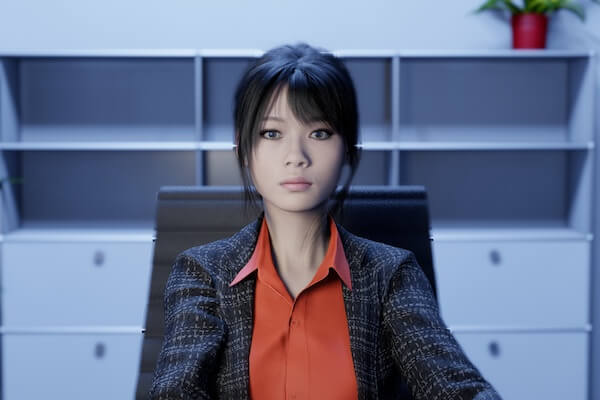
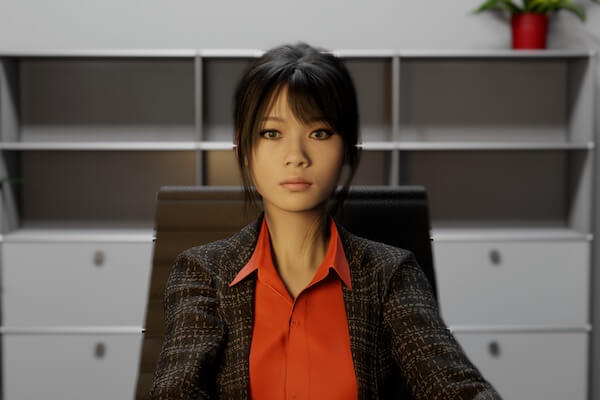
Practical Steps to Correct Mixed Light in Your Office Area
- Change your light bulbs. Many manufacturers make light bulbs available in different color temperatures. Do your best to make sure that all of the lights in your Zoom room are of the same
color temperature or as close as you can. For example, if you have a lot of windows with sunlight pouring through, be sure to purchase bulbs that are in the daylight spectrum. This will give a
much more pleasing and natural look to your video. You may also want to consider using an RGB LED light bulb. These lights are adjustable, both in color and brightness. - Turn off lights that do not match. Don’t be afraid to turn some lights off. Sometimes it is better to turn a light off than to have a light that is a different color temperature.
- If you have a camera that allows you to adjust the color temperature, but sure to set it to match the lighting.
- Purchase studio lighting if your budget allows.
Studio Lighting
One of the main reasons many commercial photographers do not solely use sunlight is they need to be able to create any type of light at any time of day, and any time of year. Studio lighting will give you consistent results every time. If your goal is to have a setup that just works this is the way to go. Studio lighting has many advantages over household lights and even daylight. It can be adjusted for brightness and in many cases color temperature.
In recent years LED lights have grown in popularity for their power efficiency, size, cool operating temperature, weight, and flexibility when compared to more traditional studio lighting. LED lighting has also seen a dramatic drop in overall cost.
As we stated earlier, when selecting a light, size matters. You will see many different options for lighting your zoom room. You need to remember a few things.
- The larger the light source, the softer and more flattering the light will be.
- What is the color temperature range of the light you are considering.
Types of LED Lights
One of the most popular lights available today is the ring light. Ring lights create a beautiful light that many love. It is the de facto standard for the Instagram fashion or beauty blogger. No doubt, because it’s smooth and even light. The tell-tail of the ring light, and why some-including myself, choose not to use it are the circular catchlights you will see in the eye.
But, just as some do not care for the catchlight the ring light provides, just as many love it. So, don’t let that hinder you. Quality ring lights can be found for a great price.
The next type of light you may consider is the LED panel. Panels are manufactured in many sizes. Just remember that size matters. I would urge you to get the largest-sized panel your budget allows.
The last consideration for a LED light is the color temperature range. Some LED panels have a set color temperature – normally about 5500ºK or daylight. Higher quality panels may be bi-color. These lights have LEDs that are balanced to 3200ºK (incandescent light) and 5500ºK (daylight). You can set the color temperature anywhere in that range.
Things to Remember
- It is important to remember that the larger the light the softer and better it will make you look.
- The angle of the light is important. Never place the main light behind you whether that is a window or a house light.
- Always make sure the brightest light is used as the main light for you.
- Be sure that all of the lights in your space are in the same color temperature range. If you follow these steps you will be well on your way to having great light on your next virtual presentation.
Title Image by Chris Montgomery on Unsplash
2 Comments
Comments are closed.